Chocolate Cherry Upside Down Cake Recipe: A Sweet Treat Straight from My Kitchen to Yours
Chocolate Cherry Upside Down Cake Recipe: A Sweet Treat Straight from My Kitchen to Yours
Equipment
- 9-inch round cake pan
- Mixing bowls (because we all know one bowl is never enough!)
- Whisk
- Electric mixer (or some good old-fashioned elbow grease!)
- Spatula
- Cooling rack
- Measuring cups and spoons
Ingredients
- 1 cup pitted fresh or canned cherries
- 1/4 cup brown sugar
- 2 tbsp unsalted butter, melted
- 1 tsp vanilla extract
For the Cake:
- 1 1/2 cups all-purpose flour
- 1/2 cup unsweetened cocoa powder
- 1 tsp baking powder
- 1/2 tsp baking soda
- 1/4 tsp salt
- 1/2 cup unsalted butter, softened
- 1 cup granulated sugar
- 2 large eggs
- 1 tsp vanilla extract
- 1/2 cup buttermilk
Notes
Step-by-Step Instructions to Bake with Love
Step 1: Preheat the Oven
First things first—preheat your oven to 350°F (175°C). Grease your 9-inch round cake pan with butter or non-stick spray. I like to line the bottom with parchment paper for good measure. It makes the flip so much easier!Step 2: Make the Cherry Layer
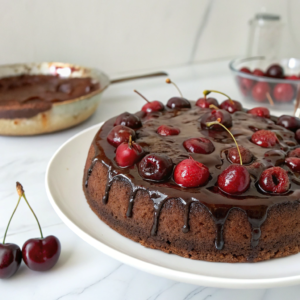
In a small bowl, stir together the melted butter, brown sugar, and vanilla extract. Pour that sweet mixture into the bottom of your cake pan. Then, arrange your cherries on top. This will be the beautiful, glossy topping when we flip the cake later!Step 3: Mix the Dry Ingredients
In a separate mixing bowl, whisk together the flour, cocoa powder, baking powder, baking soda, and salt. Set that aside for now.Step 4: Cream the Butter and Sugar
In another bowl (yes, another one!), beat the softened butter and granulated sugar together until it’s light and fluffy. I always imagine I’m whipping love right into the batter.Step 5: Add the Eggs and Vanilla
Crack in the eggs one at a time, beating well after each addition. Then, add the vanilla extract—because vanilla just makes everything better.Step 6: Bring It All Together
Now it’s time to combine the dry ingredients with the wet. Alternate adding the dry mixture and buttermilk to the butter mixture. Start and end with the dry ingredients. Mix until just combined. Don’t overmix—we want a tender cake, not a tough one!Step 7: Pour the Batter
Gently pour your cake batter over the cherry layer in the pan. Smooth it out with a spatula, making sure it’s even.Step 8: Bake with Love
Pop that pan in the oven and bake for 35-40 minutes. You’ll know it’s done when a toothpick inserted into the center comes out clean. Your kitchen will smell like chocolate heaven—don’t say I didn’t warn you!Step 9: The Big Flip
Once the cake is out of the oven, let it cool in the pan for 10 minutes. Then, run a knife around the edges and carefully invert it onto a serving plate. Hold your breath and flip—it’s always a moment of suspense, but trust me, it’s worth it!Helpful Tips from My Kitchen to Yours
- Use fresh cherries if you can—they make all the difference.
- Don’t overmix the batter; a gentle hand makes a tender cake.
- Cool before flipping to avoid any sticky situations.
Variations to Make It Your Own
- No cherries? Try raspberries or sliced peaches instead.
- Feeling fancy? Add a splash of cherry liqueur to the cherry layer.
- Gluten-free option: Use your favorite gluten-free flour blend.